I'll walk you through the process of releasing your own framework on CocoaPods, Carthage, and SPM. We will need a couple of things upfront:
- GitHub account
- Homebrew installed
- Xcode
After installing homebrew, we need to install Carthage and Cocoapods. Open a terminal and run this command:
brew install cocoapods && brew install carthage
All dependencies are ready. Now we will create a simple library with the SwiftUI view - CenteredScrollView. It will center content on screen when content is not higher than screen height, if it is - it will scroll.
CocoaPods
We will start with the CocoaPods because it will fast-track the process.
I'll run one simple command that will create the structure and files required for the pod:
pod lib create CenteredScrollView
This command takes you through pod creation with simple questions, here are my answers:
What platform do you want to use?? [ iOS / macOS ]
 >
ios
What language do you want to use?? [ Swift / ObjC ]
 >
swift
Would you like to include a demo application with your library? [ Yes / No ]
 > No

Which testing frameworks will you use? [ Quick / None ]
 > None

Would you like to do view based testing? [ Yes / No ]
 > No
After questions are answered it will open Xcode and we can prepare a pod.
Now find the ReplaceMe file and change its name to CenteredScrollView.
Before we start, change Pods development target to iOS 13 and MacOS 11. To do that, change CenteredScrollView.podspec. Around line 31 modify s.ios.deployment_target to 13.0. Close Xcode, in the terminal, go to the Example folder, and run pod install.
Open Xcode. We are ready to code! Open CenteredScrollView file and add our new view:
import SwiftUI

public struct CenteredScrollView<Content: View>: View {
    var content: () -> Content

        init(@ViewBuilder content: @escaping () -> Content) {
        self.content = content
    }
    public var body: some View {
        GeometryReader { geometry in
            ScrollView {
                VStack(alignment: .center, content: content)
                .frame(width: geometry.size.width)
                .frame(minHeight: geometry.size.height)
            }
        }
    }
}

struct CenteredScrollView_Previews: PreviewProvider {
    static var previews: some View {
        Group {
            CenteredScrollView(){
                Text("test")
            }
            CenteredScrollView(){
                ForEach(1..<20) {
                    Text("Test \($0)")
                        .font(.largeTitle)
                }
            }
        }
    }
}
Now it is a good moment to push everything to GitHub. Create your own new repo, add remote to the pod, and push everything:)
When you are ready, run pod lib lint form pod folder. This will check if our pod is valid. If you see some warnings, you can fix them easily. I had to update podspec, because of the lack of a swift version and bad link to the repo. If linting gives no warnings, CocoaPod is ready!
This is how it should look:
pod lib lint

 -> CenteredScrollView (1.0.0)
    - NOTE  | xcodebuild:  note: Using new build system
    - NOTE  | xcodebuild:  note: Using codesigning identity override: -
    - NOTE  | xcodebuild:  note: Build preparation complete
    - NOTE  | xcodebuild:  note: Planning
    - NOTE  | xcodebuild:  note: Building targets in parallel
    - NOTE  | xcodebuild:  note: Using codesigning identity override:

CenteredScrollView passed validation.
Now I'll pause CocoaPods, we will get back to it later:)
SPM
The Swift package manager is Apple's way to manage dependencies. It requires thePackage.swift file to be present in the root folder of the library. Create new Package.swift and open it.
Now we need to describe the package:
// swift-tools-version:5.2
import PackageDescription

let package = Package(
    name: "CenteredScrollView",
    platforms: [.iOS(.v13)],
    products: [
        .library(
            name: "CenteredScrollView", targets: ["CenteredScrollView"])
        ],
        dependencies: [ ],
        targets: [
            .target(
                name: "CenteredScrollView",
                path: "CenteredScrollView",
                sources: ["Classes"]),
    ]
)
The declaration is straightforward, the most important thing is to point to the right folder with source files, in our case Classes.
Our library doesn't have dependencies, has one product and one target. For more complex frameworks, we can declare many targets, add dependencies, different platforms, and more. Apple makes extensive documentation for SPM available here.
Carthage
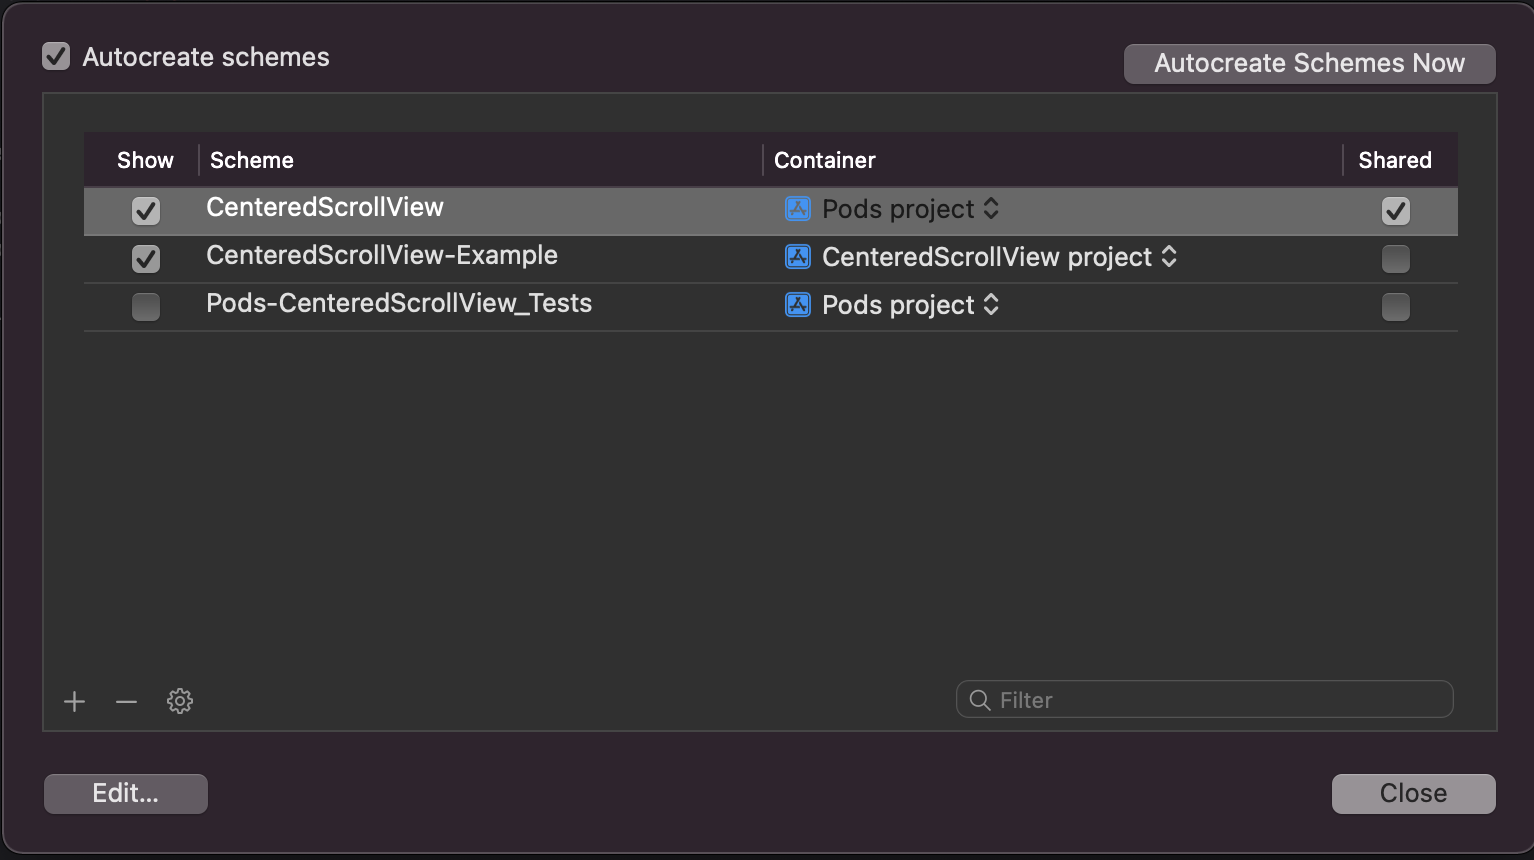
Carthage requires a shared scheme to be present in the repo. This scheme will be built from code to Framework or XCFramework. We need to check if the shared scheme is present:
- Open Xcode
- Open Manage Schemes...
- Make sure only CenteredScrollView target is shared:

Carthage is ready!
Preparing repo
Now we are ready to publish our library! Commit and push all changes we made.
Tags
Most of the time you want to version library. This is why tags are very important. My new library have version 1.0.0, this is why I'll create a git tag with the name 1.0.0.
Publishing to CocoaPods
Now we circle back to CocoaPods. We need to publish our pod!
In the terminal, run this command:
pod trunk push CenteredScrollView.podspec
It should give happy output:
pod trunk push CenteredScrollView.podspec
Updating spec repo `trunk`
Validating podspec
 -> CenteredScrollView (1.0.0)
    - NOTE  | xcodebuild:  note: Using new build system
    - NOTE  | xcodebuild:  note: Using codesigning identity override: -
    - NOTE  | xcodebuild:  note: Build preparation complete
    - NOTE  | xcodebuild:  note: Planning
    - NOTE  | xcodebuild:  note: Building targets in parallel
    - NOTE  | xcodebuild:  note: Using codesigning identity override:

Updating spec repo `trunk`

-----------------------------------------------------------------------
 🎉  Congrats

 🚀  CenteredScrollView (1.0.0) successfully published
 📅  December 11th, 13:57
 🌎  https://cocoapods.org/pods/CenteredScrollView
 👍  Tell your friends!
-----------------------------------------------------------------------
This will add an entry in the CocoaPods repo, making it available for all users!
Bonus - XCFramework
Apple created a new way to distribute binaries - XCFramework. This type of binary contains compiled framework for all architectures (iPhone, simulator, macOS, and others).
In our case, I'll build only for iOS. This will require three steps script. Make new file create_xcframework.sh and add this inside:
#!/bin/bash

xcodebuild archive\
    -workspace Example/CenteredScrollView.xcworkspace\
    -scheme CenteredScrollView\
    -destination "generic/platform=iOS"\
    -archivePath "archives/CenteredScrollView"\
    SKIP_INSTALL=NO\
    BUILD_LIBRARY_FOR_DISTRIBUTION=YES

xcodebuild archive\
    -workspace Example/CenteredScrollView.xcworkspace\
    -scheme CenteredScrollView\
    -destination "generic/platform=iOS Simulator"\
    -archivePath "archives/CenteredScrollView-Sim"\
    SKIP_INSTALL=NO\
    BUILD_LIBRARY_FOR_DISTRIBUTION=YES\

xcodebuild -create-xcframework\
        -framework "archives/CenteredScrollView-Sim.xcarchive/Products/Library/Frameworks/CenteredScrollView.framework"\
        -framework "archives/CenteredScrollView.xcarchive/Products/Library/Frameworks/CenteredScrollView.framework"\
        -output "xcframeworks/CenteredScrollView.xcframework"
First, Xcode will build a framework for iOS, next Simulator, the last step is to assemble XCFramework.
I'll distribute XCFramework as a release on GitHub:)


