Lighting fast rendering with Metal

In the previous post, we touched image processing and rendering. We made UIImage from CIImage with two filtering effects.
Dynamic filtering
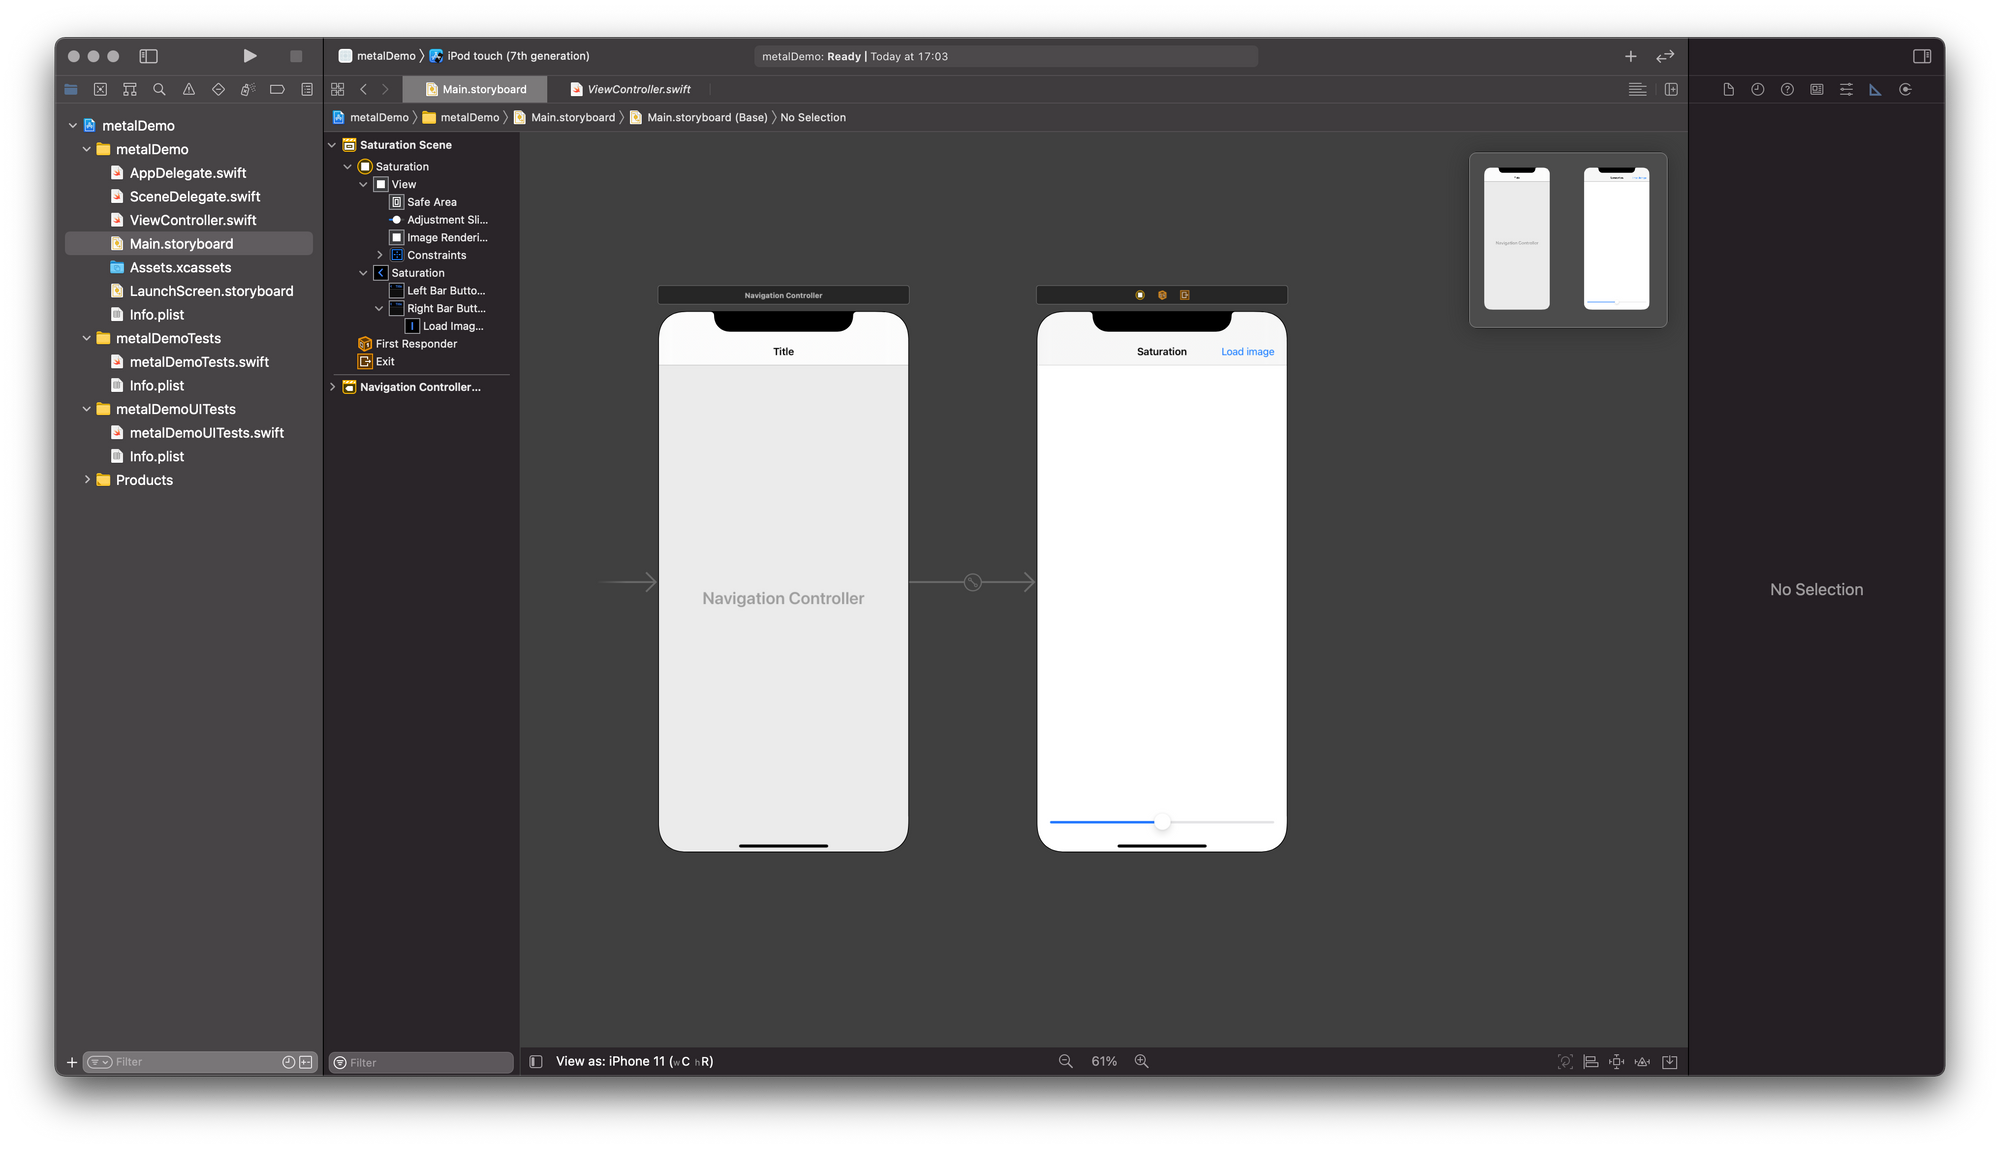
This time we will create a simple app for changing image saturation. It will contain an image picker, a view for displaying results, and a slider for filter adjustment:
You can download the starter project here. It has all views and outlets connected.
Loading image
Now, let's add image loading functionality (I'll stick to the MVC pattern for simplicity). I'll use UIImagePickerController. Place code in loadImageDidTap:
@IBAction func loadImageDidTap(_ sender: UIBarButtonItem) {
    let imagePickerVC = UIImagePickerController()
    imagePickerVC.sourceType = .photoLibrary
    present(imagePickerVC, animated: true)
}
It will show system library picker, but it needs user selection, we need to implement delegate:
extension ViewController: UIImagePickerControllerDelegate, UINavigationControllerDelegate {
    func imagePickerController(_ picker: UIImagePickerController, didFinishPickingMediaWithInfo info: [UIImagePickerController.InfoKey : Any]) {
        picker.dismiss(animated: true, completion: nil)

        if let image = info[.originalImage] as? UIImage {
            // TBD
        }
    }
}
With that, our view controller will know what to do when the user selects something. To make it work, the view controller needs to be set as a delegate for the picker. Modify loadImageDidTap, image picker needs delegate:
@IBAction func loadImageDidTap(_ sender: UIBarButtonItem) {
     let imagePickerVC = UIImagePickerController()
     imagePickerVC.sourceType = .photoLibrary
     imagePickerVC.delegate = self // adding delegate
     present(imagePickerVC, animated: true)
}
Filtering
The second part will cover filtering. Add new file for class to project - Filter. Add this code to a new file. It will handle initialization for filtering class:
import CoreImage
import UIKit

final class Filter {
    private let originalImage: CIImage
    private let filter = CIFilter(name: "CIColorControls")!
    init(with image: UIImage) {
        originalImage = CIImage(image: image)!
        filter.setValue(originalImage, forKey: "inputImage")
    }
}
Now, actual filtering. Our class will take float value as an input and produce a filtered image as an output. For now, it will return UIImage. Add a new method to Filter:
func filter(saturation: NSNumber) -> UIImage {
    filter.setValue(saturation, forKey: kCIInputSaturationKey)
    return UIImage(ciImage: filter.outputImage!)
}
Simple code - set value of saturation on the filter and produce output as UIImage.
Displaying
Now, we'll go back to our controller. First, add a new property to ViewController class:
private var filter: Filter?We need view to render out the filtered image, modify viewDidLoad and add new image view property to the controller:
private var imageView: UIImageView!
override func viewDidLoad() {
    super.viewDidLoad()
    imageView = UIImageView()
    imageView.translatesAutoresizingMaskIntoConstraints = false
    imageRenderingContainerView.addSubview(imageView)
    imageView.topAnchor.constraint(equalTo: imageRenderingContainerView.topAnchor).isActive = true
    imageView.bottomAnchor.constraint(equalTo: imageRenderingContainerView.bottomAnchor).isActive = true
    imageView.leadingAnchor.constraint(equalTo: imageRenderingContainerView.leadingAnchor).isActive = true
    imageView.trailingAnchor.constraint(equalTo: imageRenderingContainerView.trailingAnchor).isActive = true
}
Modify delegate code to create filter when a new image is picked:
extension ViewController: UIImagePickerControllerDelegate, UINavigationControllerDelegate {
func imagePickerController(_ picker: UIImagePickerController, didFinishPickingMediaWithInfo info: [UIImagePickerController.InfoKey : Any]) {
picker.dismiss(animated: true, completion: nil)
if let image = info[.originalImage] as? UIImage {
filter = Filter(with: image)
imageView.image = filter?.filter(saturation: NSNumber(value: adjustmentSlider.value))
}
}
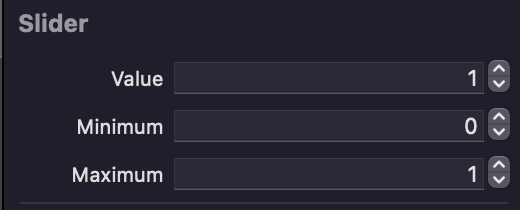
}Modified code will render the image with neutral saturation setting - 1.0; Saturation filter in our code will desaturate the image. Values from the slider will be in the range 0.0...1.0 with a default value of 1.0. Modify storyboard values:
Build and run project. I encourage you to use a real device. On the simulator, the image will be rendered upside down!
Image loads, and is shown on screen, but the slider doesn't work! We need to handle slider updates:
@IBAction func sliderDidChange(_ sender: UISlider) {
    guard let filter = filter else { return }
    imageView.image = filter.filter(saturation: NSNumber(value:sender.value))
}
Every time slider will change a value, the image renders and the screen is updated. Build and run the project again, load the image, and play with the slider.
It works, but performance is very poor. This happens because we use UIImage for showing filtering result. Rendering CIImage to UIImage takes ages. I'm running code on iPhone 12 Pro and this takes lighting year to render a new image:
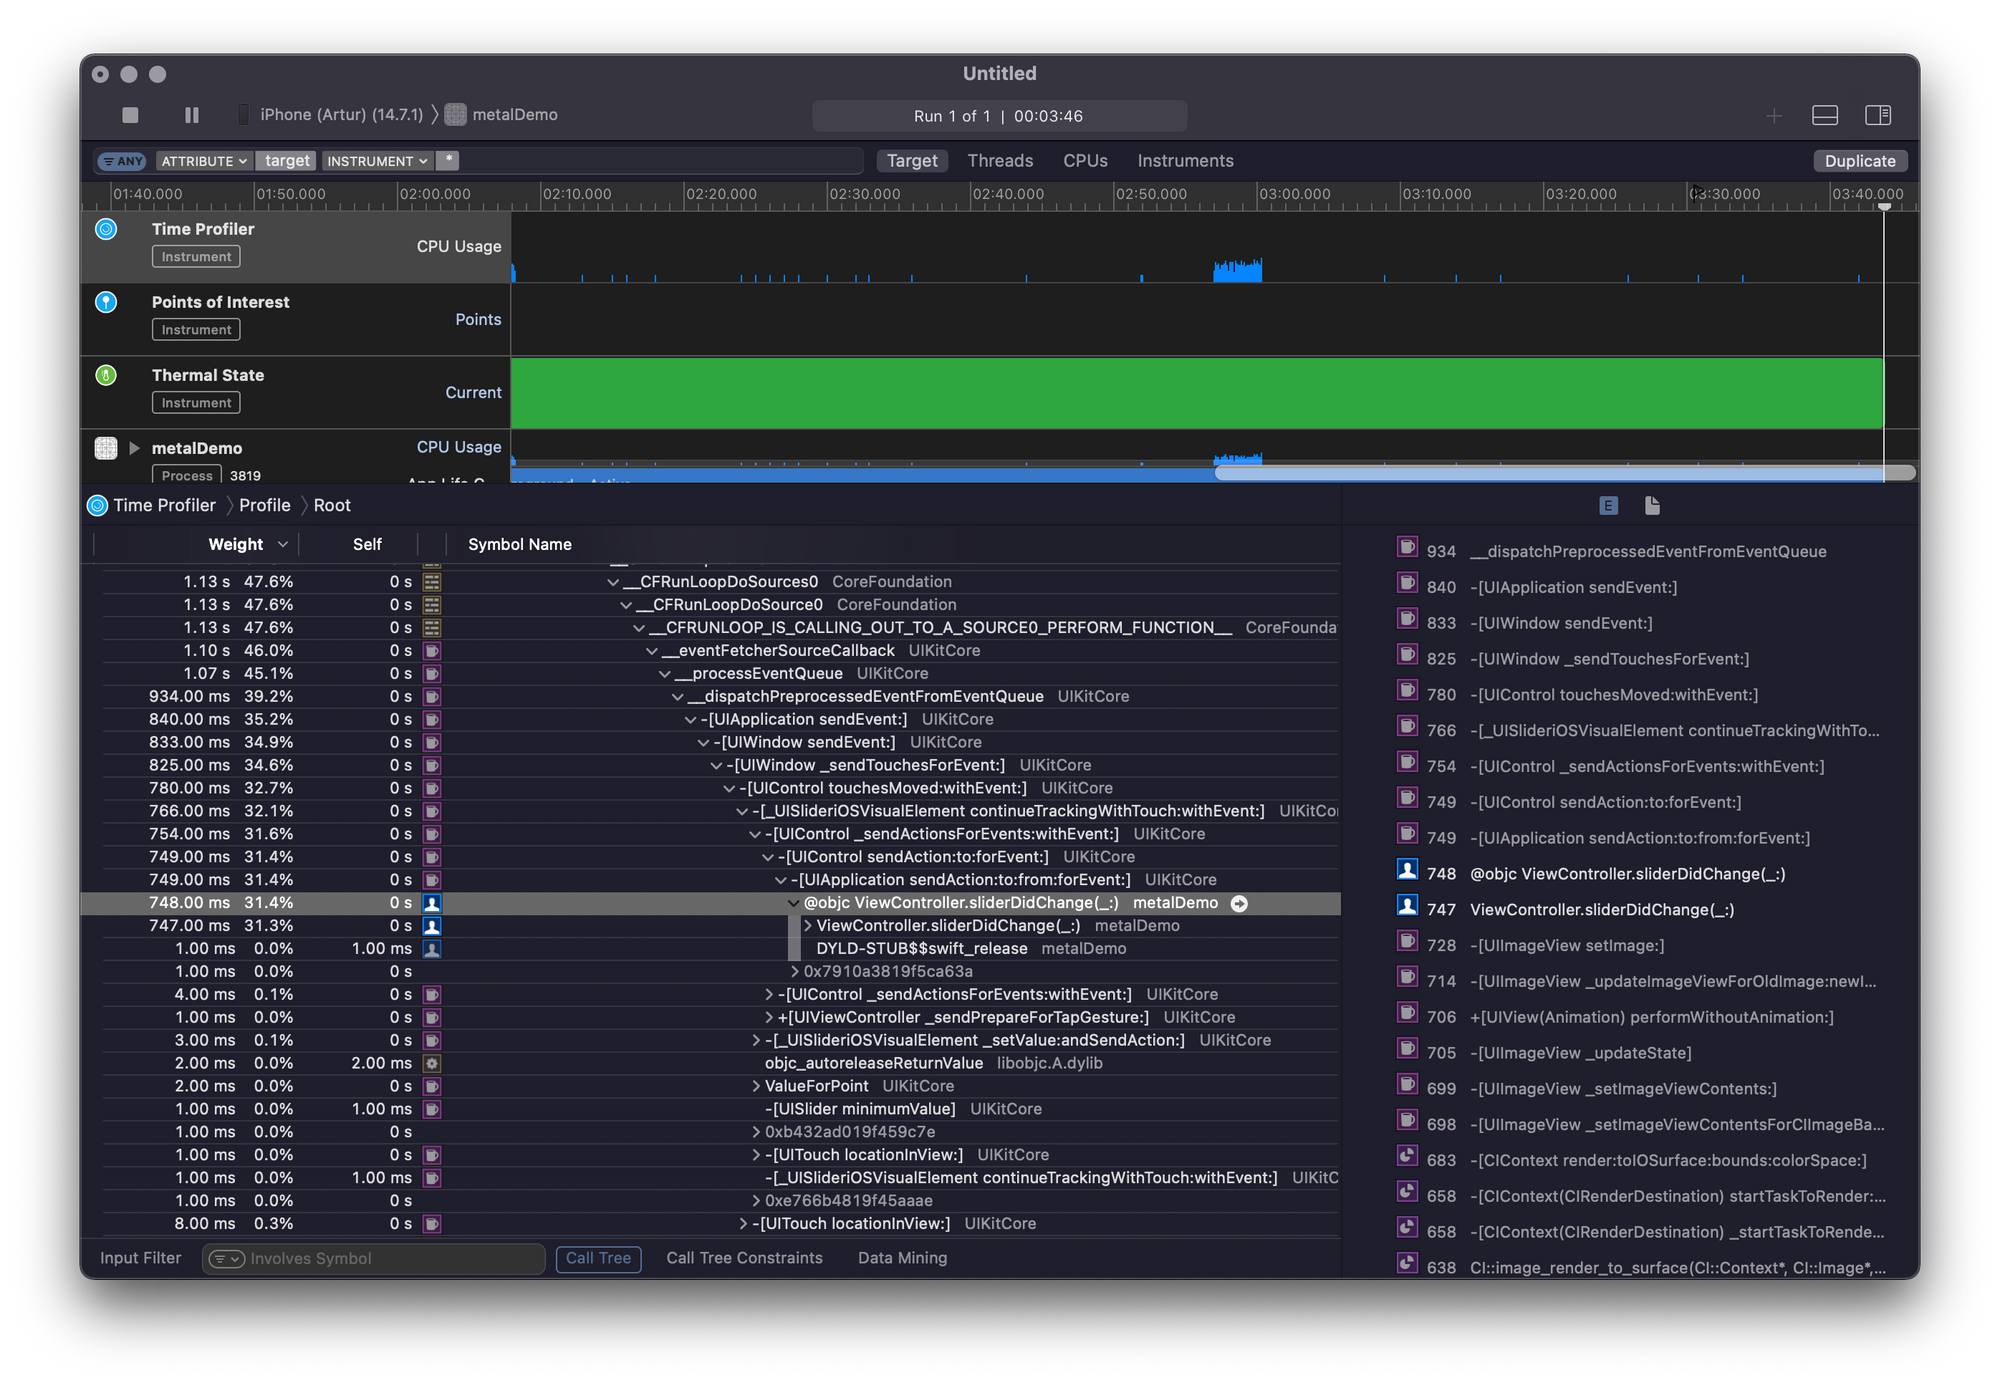
I'm using a time profiler to check where code takes the most time to execute and what is holding back our performance. You can check many useful things with Instruments - timings, network, allocations, and other cool stuff to know how your app is doing. I encourage you to explore Instruments app if you haven't used it yet.
From this screenshot, it clearly looks like the slider change method is the heaviest. We can optimize that with help of Metal API.
Metal view
This part of the code will cover the implementation of simple rendering in Metal. Add new file - MetalView to project and copy code below. I'll post the whole implementation at once and go through it line by line.
import UIKit
import MetalKit
import CoreGraphics
import CoreImage

class MetalView: MTKView {

    var context: CIContext! // 1
    var queue: MTLCommandQueue! // 2
    let colorSpace = CGColorSpaceCreateDeviceRGB() // 3
    var image: CIImage? { // 4
        didSet {
            drawCIImge()
        }
    }

    // 5
    required init(coder: NSCoder) {
        super.init(coder: coder)
        self.isOpaque = false
        guard let device = MTLCreateSystemDefaultDevice() else {
            print("darn")
            return
        }
        self.device = device
        self.framebufferOnly = false
        self.isPaused = true
        self.enableSetNeedsDisplay = true
        self.context = CIContext(mtlDevice: device)
        self.queue = device.makeCommandQueue()
    }

    private func drawCIImge() {
        guard let image = image else { return }
        let drawable = currentDrawable!
        let buffer = queue.makeCommandBuffer()!
        // 6
        let widthScale = drawableSize.width / image.extent.width
        let heightScale = drawableSize.height / image.extent.height

        let scale = min(widthScale, heightScale)

        let scaledImage = image.transformed(by: CGAffineTransform(scaleX: scale, y: scale))

        let yPos = drawableSize.height / 2 - scaledImage.extent.height / 2

        let bounds = CGRect(x: 0, y: -yPos, width: drawableSize.width, height: drawableSize.height)

        // 7
        context.render(scaledImage,
                       to: drawable.texture,
                       commandBuffer: buffer,
                       bounds: bounds,
                       colorSpace: colorSpace)
        // 8
        buffer.present(drawable)
        buffer.commit()
        setNeedsDisplay()
    }
}
CIContext
I talked about the context in the previous post, this one will work in tandem with the metal device.- Command queue
Instance ofMTLCommandQueuewill handle the list of commands, that Metal Device needs to execute, it is thread-safe. It will create instances of commands buffers to be processed by GPU. - Color Space
Interpreter for color values to be displayed - Image
Setting this property will cause the view to re-render itself with new content. - Initialization
Our required init instantiate all necessary objects for Metal rendering to work - Image scaling to screen size
We have to manually resize the image to fit the screen. This code makes aspect fit scaling and centers image on the screen. - Rendering
Now, we have prepared the image and all needed preparation for rendering is done, context will render our image to current drawable texture using a metal device. - Displaying
In our buffer we have a command for rendering, now we preset drawable and commit buffer. The buffer needs to be committed to be scheduled by Metal to be processed on GPU.setNeedsDisplay()will trigger UIKit to refresh our view and the filtered image is on screen!
Refactoring
The metal view is ready, let's use it.
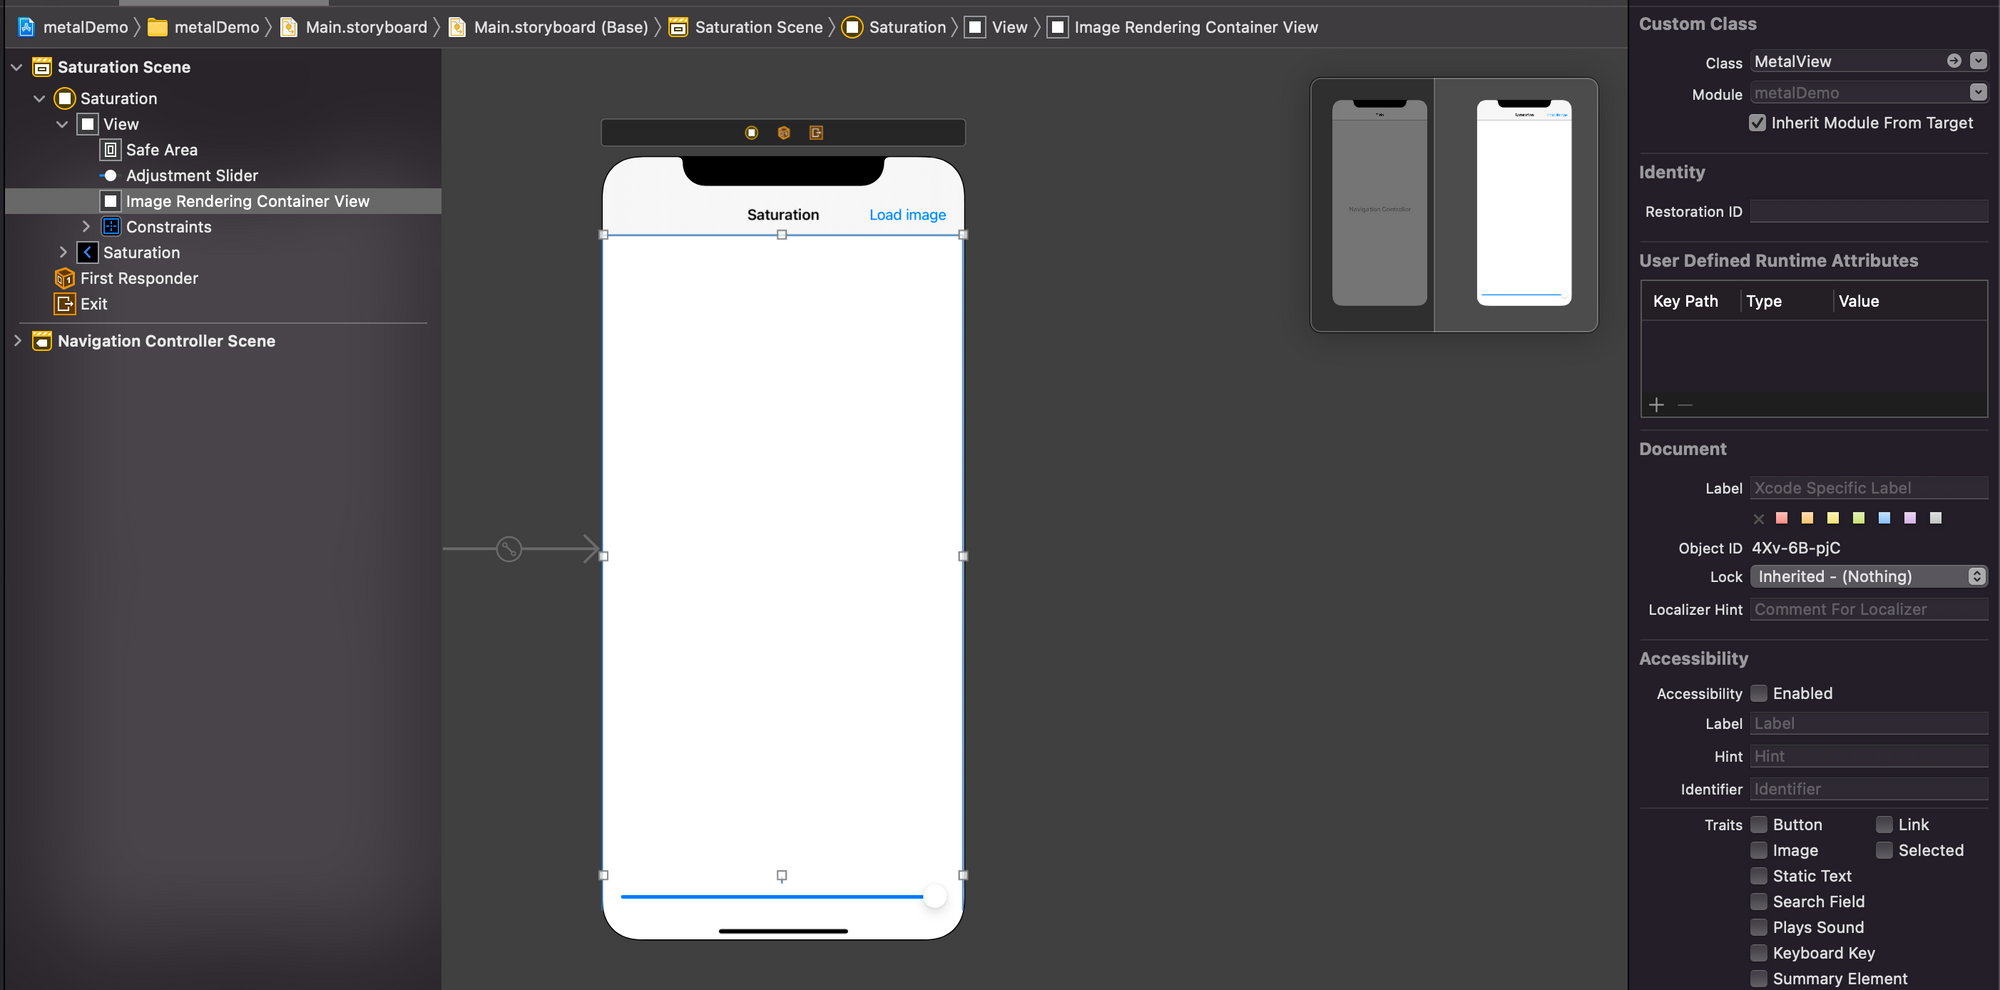
Change imageRenderingContainerView type to MetalView.
We don't need image view anymore, change view did load:
override func viewDidLoad() {
    super.viewDidLoad()
}
In filter class, change filtering method, it should return CIImage now:
func filter(saturation: NSNumber) -> CIImage {
    filter.setValue(saturation, forKey: kCIInputSaturationKey)
    return filter.outputImage!
}
In ViewController change slider handling method:
@IBAction func sliderDidChange(_ sender: UISlider) {
    guard let filter = filter else { return }
    imageRenderingContainerView.image = filter.filter(saturation: NSNumber(value: sender.value))
}
Change picker delegate:
func imagePickerController(_ picker: UIImagePickerController, didFinishPickingMediaWithInfo info: [UIImagePickerController.InfoKey : Any]) {
    picker.dismiss(animated: true, completion: nil)

    if let image = info[.originalImage] as? UIImage {
        filter = Filter(with: image)
        imageRenderingContainerView.image = filter?.filter(saturation: NSNumber(value: adjustmentSlider.value))
    }
}
The last change is in the storyboard. We need to set imageRenderingContainerView to be MetalView:
Build and run project. Select image and use slider. Can you fill difference? Rendering is smooth and fast.
If you have a problem building or just don't want to follow the guide and copy code, a working demo is available here.
I hope you learned something and new knowledge will help writing something awesome!